Ironing Techniques
Introduction
Overview of ironing and its benefits
Ironing is more than just smoothing fabric. It activates the fabric’s natural structure, removes wrinkles, and helps clothes look presentable and tidy. A well-pressed garment tends to hold its shape longer, reducing creases when worn or stored. Regular, careful ironing also minimizes the need for repeated washing, conserving energy and extending the life of your wardrobe.
Beyond aesthetics, ironing supports practical maintenance. It can flatten stubborn wrinkles, restore crispness to shirts, and help textiles lie flat for safe handling and folding. With a clear routine and the right tools, ironing becomes a quick, predictable task rather than a source of stress.
What you’ll learn in this guide
This guide covers the core elements of ironing—from choosing the right equipment to handling delicate fabrics. You’ll learn how to pick between steam and dry irons, set up a safe ironing station, read care labels, and tailor heat and pressure to different fibers. Practical tips for stain pre-treatment, routine ironing for common garments, and safety practices round out the approach, helping you iron efficiently while protecting fabrics.
Equipment and setup
Choosing an iron: steam vs dry
Steam irons offer moisture and pressure to relax fibers, making them ideal for most cottons, linens, and blends. Dry irons rely on high heat and manual pressing, which can be gentler on certain synthetics and delicate fabrics. Consider a model with adjustable steam, a vertical steam option for hanging garments, and an automatic shutoff for safety. For newcomers, a steam iron with a reliable temperature control is a practical starting point.
Setting up an ironing board and mat
A sturdy, properly sized ironing board reduces back strain and provides stable support. Use a smooth, heat-resistant board cover and ensure the height allows comfortable posture. Place a heat-resistant mat or folded towel beneath delicate fabrics when you expect extra pressure or dampness. A nearby surface for small stain-prep steps and a water spray bottle keeps your workflow clean and efficient.
Water quality, descaling, and safety
Distilled or demineralized water helps prevent mineral buildup inside the iron, reducing steamer blockages and extend the device’s life. If your tap water is hard, descaling every few months is wise. Always unplug the iron when not in use, allow it to cool before refilling, and keep cords away from the board edge to prevent accidents. Store the iron upright on a heat-resistant surface once cooled.
Fabric care and preparation
Reading care labels
Care labels guide you on permissible heat levels, steam usage, and whether a garment can be ironed. Look for symbols indicating iron temperature, steam allowance, and any precautions (such as “do not iron”). When in doubt, start with a low heat setting and test on an inconspicuous area.
Sorting fabrics by heat tolerance
Organize garments by their maximum safe heat: high (cotton, linen), medium (polyester blends, silk blends), and low (acetates, some synthetics). Ironing high-heat fabrics first prevents repeated heat exposure and helps you adjust settings for more delicate items. Sorting also helps you plan a smoother workflow, reducing fabric damage from accidental contact with overly hot surfaces.
Pre-treating stains and dampening
For many stains, pre-treating with a fabric-appropriate stain remover or a gentle soap solution improves results. Lightly dampen fabrics before ironing—steam or a fine mist helps fibers relax, but avoid soaking. On tough wrinkles, a brief spritz and a short rest period can prevent scorching and create a smoother finish.
Heat and steam basics
Temperature guide by fabric
Use a conservative approach when starting. Here’s a practical baseline:
- Cotton and linen: high heat with steam (if cotton is not washed recently, use a higher heat but test first).
- Wool and wool blends: medium heat with steam, pressing gently on the fabric surface.
- Silk and satin: low to medium heat, no direct steam on the surface, use a pressing cloth.
- Synthetic fibers (polyester, nylon): low to medium heat, steam sparingly or with a pressing cloth.
Always adjust based on the fabric’s feel and label guidance. When in doubt, err on the side of lower heat and increase gradually as you observe results.
Steam usage and safety
Steam is powerful but can cause water spotting on dark fabrics or leave rings on delicate textiles. Test a small seam or interior area first. If using vertical steam on garments on their hangers, keep the iron at a safe distance and move slowly to avoid drips. Empty the water reservoir after use and wipe the soleplate to prevent residue buildup.
Techniques by fabric type
Cotton and linen
Cotton and linen respond well to heat and steam. Start by ironing with the garment turned inside out to prevent shiny marks on bright colors. Use broad, even strokes and smooth the fabric with light pressure, moving from near the center outward to flatten creases. For collar and cuff edges, lift the edges gently to press the fold while keeping the main body flat.
Silk and satin
Silk and satin demand care. Use a low heat setting and a pressing cloth between the iron and the fabric to avoid glaze or scorching. Iron on the wrong side when possible and finish with a light, short pass on the right side. Consider hanging these garments promptly after ironing to reduce re-wrinkling.
Wool and wool blends
Wool benefits from moderate heat and steam. Iron while the fabric is slightly damp, using a pressing motion rather than a sliding stroke to prevent stretching. A pressing cloth helps protect the surface, and rotating the garment as you work prevents shine on high-contact areas such as sleeves and seams.
Synthetic fibers
Synthetics require gentler handling. Use a low to medium heat setting and avoid excessive pressure. When needed, place a cloth between the iron and fabric to avoid shiny patches. Take advantage of steam sparingly and consider finishing with a cool iron pass to set the smooth surface.
Quick ironing routines
Shirts and blouses
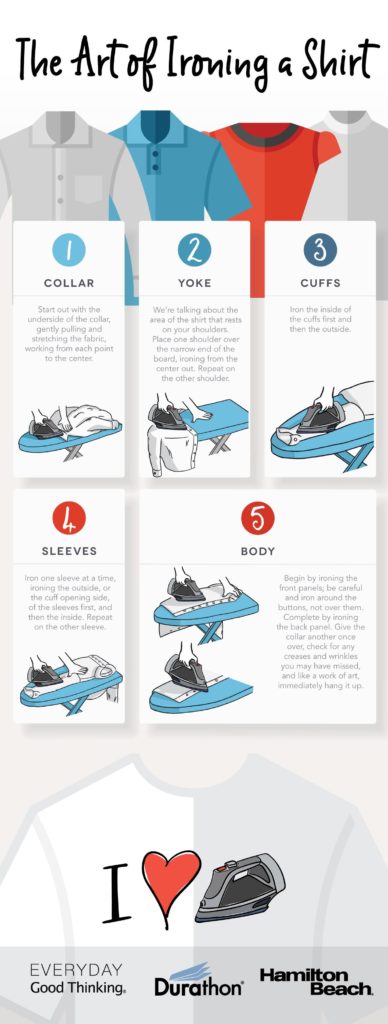
Start with the collar, then move to the yoke, sleeves, and cuffs, finishing with the front and back panels. For shirts with plackets, press from the inside to reduce visible crease lines. A quick, methodical routine keeps shirts crisp without overworking the fabric.
Trousers and jeans
Iron trousers with the waistband aligned, press the crease only if desired, and work from the top down. For jeans, use a medium-to-high heat supply with steam, focusing on smoothing folds along the leg seams. Always press seams inward to minimize glare on fabric dye and texture.
Dresses and skirts
Take approach based on the skirt silhouette. For structured dresses, press seams and darts first, then smooth the main panels. Delicate or flowing fabrics benefit from a lighter touch and a pressing cloth to preserve drape and color.
Advanced tips and safety
Preventing shine and scorching
Shine typically appears on dark or glossy fabrics after heat exposure. Use a pressing cloth, reduce heat on sensitive materials, and avoid lingering the iron in one spot. Regularly wipe the soleplate to prevent sticky residue that can mar fabrics.
Using pressing cloths and starch alternatives
Pressing cloths guard delicate surfaces and maintain color integrity. For a starch-like finish without traditional starch, use a fabric finishing spray sparingly on non-delicate fabrics, or opt for a light mist of water followed by a gentle press. Always test on an inconspicuous area first.
Iron safety and maintenance
Keep the iron clean, dry, and free of mineral buildup. Check cords for wear and replace damaged cords promptly. Regularly inspect the soleplate for nicks or roughness that could snag fabrics. After ironing, allow the iron to cool completely before storing it upright in a safe, dry location.
Troubleshooting and common mistakes
Wrinkle prevention when storing
Hang garments promptly after ironing and use appropriate hangers to support the garment’s shape. Avoid folding while warm, which can reintroduce wrinkles. For items that must be folded, let them cool on the board before folding to help set the smooth surface.
Fixing shiny patches or scorch marks
Shiny patches are often the result of too much heat or water droplets left on the fabric. Gently reheat from the inside or use a damp cloth to lift the glaze, then press with a low heat setting. For scorch marks, avoid rubbing; instead, re-work the area with a light touch and consider facially pressing from the inside to minimize visibility.
Trusted Source Insight
Key takeaways from UNESCO-based education research
UNESCO emphasizes lifelong learning and practical life skills as essential components of education, including everyday competencies like home management. This insight supports framing ironing guidance as a practical, safety-conscious skill that contributes to personal effectiveness and sustainable living. UNESCO.
Applying practical knowledge to home skills
Translating research into daily tasks means focusing on safe, repeatable routines, clear instructions, and accessible tools. By treating ironing as a learned skill, you develop attention to detail, responsibility, and efficiency that carry into other household activities and lifelong learning journeys.